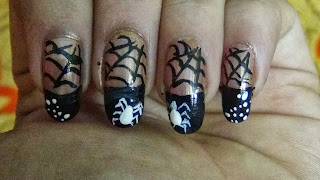
A spider web nail art Halloween design. Firstly my apologies since i did this tutorial i a bit a bit of hurry and it could have been a bit more neat and i also forgot to take pictures of steps in between. However it's pretty easy and i'll explain the steps . I'll put up with more spider web nail art designs later.
For now lets see how i did this one :)
1. Paint ur nails with a base coat.
2.Paint ur nails with a shimmer metallic nail polish, u can actually use any light metallic colour.
3. Like below use your french tip demarcations strips or just carefully make a curved french tip design with black polish .
4. Now take ur black nail art striper or nail art pen and draw 3 lines from one corner . 3 diagonal lines withh be the structure for the web. Now join with lines in between in a curved fashion the concavity facing the portion away from center. Follow the picture below.
Lastly take a white nail art brush or a white nail art pen, make 2 spiders very carefully and give some dots on the others.
5. When all the paints and polish are dry , use a layer of transparent top coat and seal in ur design.
For now lets see how i did this one :)
1. Paint ur nails with a base coat.
2.Paint ur nails with a shimmer metallic nail polish, u can actually use any light metallic colour.
3. Like below use your french tip demarcations strips or just carefully make a curved french tip design with black polish .
Lastly take a white nail art brush or a white nail art pen, make 2 spiders very carefully and give some dots on the others.
A great Halloween Spider Web Nail Art Design ! :) Stay tuned for more - Zinnia


No comments:
Post a Comment